Essential home insulation: Radiant Barriers
Top blog articles
If you happen to live in a part of the country that experiences extreme summers, your cooling bills are bound to be through the roof. But there is one simple home insulation hack that could make your home more energy-efficient while keeping your home cooler and being cost-effective: radiant barriers.
In this short read, we’re going to introduce you to what radiant barriers are, how they work, the different types of radiant barriers, and more.
What are radiant barriers?
A radiant barrier is a reflective building material that reflects heat radiation, or thermal radiation (also known as radiant heat) and prevents it from transferring to the building below. Because heat also transfers through conduction and convection as well, radiant barriers are often supplemented with thermal insulation to reduce the transfer of heat.
In homes, radiant barriers are installed mostly in the attics with the primary intention of reducing summer heat gain and helping reduce cooling costs.
How do radiant barriers work?
To understand how radiant barriers work, let us begin by first understanding the three ways heat transfers. The first way is what you might have observed when you keep a spoon in a hot cup of coffee, and after a while, the spoon becomes warm as well. This is called conduction.
The second way heat transfers is by convection. An example of convection is air becoming less dense and rising up when heated.
Radiant heat works by heating anything that absorbs its energy and travels in a straight line away from any surface.
Radiant barriers and reflective insulation systems work by reducing the amount of radiant heat being transferred. In the summers, the roof of your home gets hot due to the radiant energy of the sun. This heat is transferred through conduction through your roofing materials to the attic. A radiant barrier reduces the radiant heat transfer from the underside of the roof to surfaces in the attic and the attic floor.
In order to work effectively, radiant barriers need to be facing an air space. One must also make sure there isn’t any dust accumulation on the reflective surface, since that would hamper the reflective capabilities of the barrier.
Radiant barriers work best in warmer climates, and even there, in attics that have cooling air ducts. Studies show that you can expect energy savings of between 10% and 20% on your cooling costs by using this insulation product and may be able to further reduce costs by using a smaller air conditioning system.
If you live in cooler climates, it would make more sense for you to invest in additional thermal insulation than a radiant barrier.
Types of radiant barriers
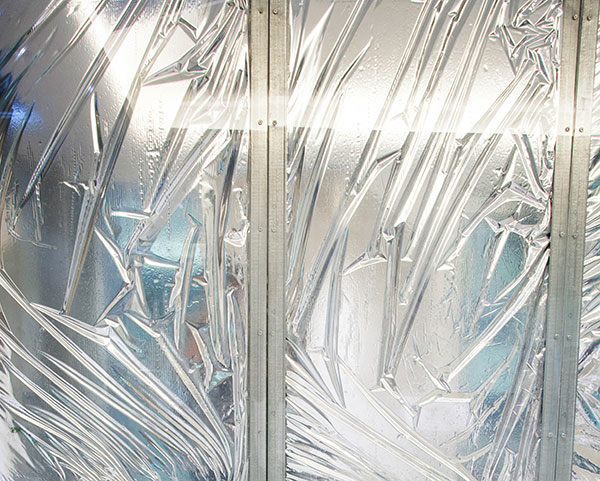
There are five types of radiant barriers that you could choose from. And as you read on, you will realize that they all have one component in common: aluminum foil.
- Foil on one side with a backing on the other made of kraft paper or polypropylene. This can be strengthened further by sandwiching fiber webbing in between the two materials.
- Sheathing materials that come from the manufacturer with foil on the facing side.
- Double-sided foil with a sandwiched layer of either cardboard, fiber webbing, Mylar, or draft paper.
- Foil-faced insulation with a backing layer of a material that deters heat conduction, such as polyethylene packing or polyisocyanurate.
- Multi-layer foil systems that form insulating when extended so that the layers of foil do not touch each other. These are designed to combat condensation difficulties faced by vapor barriers.
Choosing the right kind of radiant barrier for your home depends on the amount of heat and humidity (moisture) that your home is exposed to.
The market also has some paint manufacturers who have reflective paints which they claim work as radiant barriers. However, we wouldn’t advise you to put too much faith in those. While they may seem like an easier option in terms of installation, a study has shown that the reflectivity of the paint is only between 15% to 40%.
Costs
The cost to install radiant barrier insulation varies between $740 to $2,840. The national average cost is around $1,700for materials and installation.
Installing radiant barriers
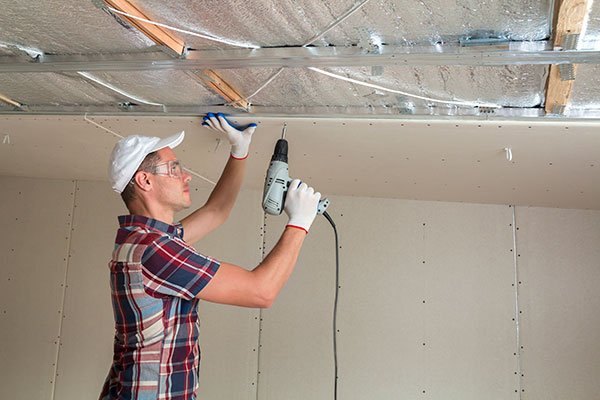
Radiant barriers are not very effective unless they are installed accurately, and for this reason, we’d advise you to hire a professional to handle the installation for you. However, if you intend to do it yourself, be sure to follow the manufacturer’s instructions word-for-word to make sure you get it right. You will also need to adhere to your local building and safety codes.
It is usually easier to install radiant barriers while a new house is being built rather than on an existing house unless the home has an open attic.
In a new house, radiant barrier foil is usually draped face down between the roof rafters. This is done to minimize dust accumulation on the reflective surface. While this is usually done before the roof sheathing material is put on, you can just as easily do it afterward by stapling the material to the bottom of the rafters.
While installing a foil-type radiant barrier, remember to allow for at least a one-inch air pocket between the material and the bottom of the roof.
Safety tips and myths
- Make sure you avoid the foil making contact with bare electrical wires. This is because reflective foils conduct electricity.
- Try to avoid installing radiant barriers on top of attic floor insulation. If you do, the barrier becomes more susceptible to trapping both dust and moisture.
- A common myth is that radiant barriers affect Wifi. The truth is that unless the barrier is directly between the router and you, this will not happen.
Written by Narayan Shrouthy. November 20, 2021
Narayan is a content writer for Kukun. With experience in both content writing and editing, Narayan mixes his writing and love for reading with his passion for music. As an active musician, He aims to be a key player in Kukun's content experience.
Top blog posts


See more >
Recommended
Join our newsletter
Get helpful renovation tips, insightful home maintenance articles, real estate market trends, and more.
Please enter a name
Please enter a valid e-mail
Your opinion matters, leave a comment
Comments
This is so incredibly simple and useful. And it’s a great way to differentiate very outdated contractors if you don’t know about that type of heat insulation …